Robot Dancers
Origin of the Project

This project originated from the year-end party after the demon returned to the DM&P headquarters from the underworld. "What!? I just came back and it's our department's turn to perform?" Just as the demon was about to run away, he was caught by the boss. "Since you are back, let's have a year-end party performance with a robot dancing!" Then the demon was assigned as the person in charge of this project.
Functional Description
Group robots dance the monster dance. This is a system that uses the ROS system to establish communication and synchronization among all robots, and uses 86ME to edit the robot's dance movements. In this project, Robot Skarner, two humanoid robots, seven 86 Hexapod and a laptop with the ROS system installed are used. And ESP8266 is used to allow all robots to synchronize their movements through the network.
Prepare materials
- Computer with ROS system installed
- Several robots
- 86Duino Zero/One matching the number of robots
- ESP8266 matching the number of robots
Hardware setup
For the robot's beauty and firmness, this project uses the special function of 86Duino's CrossBar, that is, switching the UART Port to the corresponding pin, so that the ESP8266 can be directly plugged into the SPI PORT. First, introduce the general connection and use of ESP8266:
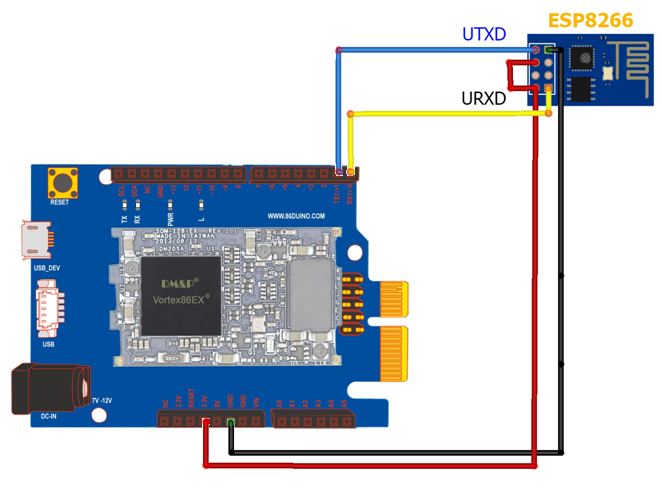

Generally, we can use Dupont wire to connect ESP8266 and 86Duino But this connection is neither beautiful nor firm.
If you want to use this special function like the demon, you must first make an ESP8266 to SPI slot adapter.
Materials:
1. Two female 2×5 ROHS
2. A cable
3. The purpose of the extra cable is to connect the ESP8266 to the 3.3v power supply.
After comparison, I think it would be easier to install by changing SPIDI to TX and SPICS to RX.

Since only TX, RX, and GND are needed, the adapter only needs to solder 3Pins, and the 3.3v is directly soldered to the cable line.

After completion, it is recommended to fill the middle with hot melt glue to fix and prevent short circuit.

After that, you can connect the ESP8266 to the SPI slot!

Environment Settings
For the installation and construction of ROS, please refer to the ROS official website.
Programming Explanation
First, let's look at the overall control architecture (HOST side):
Use the irrKlang library to play music, Segment the music and send the string command to the robot side, Of course, the finer the command, the higher the synchronization frequency.
|
1 2 3 4 5 6 7 8 9 10 11 12 13 14 |
|
Provide input to the program.
|
1 2 3 4 5 6 7 8 9 10 11 12 13 14 15 16 17 18 19 20 21 22 23 24 25 26 27 |
|
You can see that we have set a lot of different keys, then we will enter the number 2 to start programming the sync module.
|
1 2 3 4 5 6 7 |
|
After RTmode is started, the loop is kept in a constant synchronized state, allowing the loop to determine the music time and issue commands to the robot.
|
1 2 3 4 5 6 7 8 9 10 11 12 |
|
The robot uses 86ME to code its hourly movements,
and searches for settings and movements on 86ME on Github.
After coding is complete, select ESP8266 for the movement and receive commands from ROSHOST.
After completion, select All in One output programming,
but since it will be necessary to modify the programming after output, add the CrossBar function to the programming.
The io in the 86Duino libraries has the io_outpb function,
which can be directly connected to the hardware IO function,
and since this function is very difficult to control, we recommend removing it,
but these functions are the CrossBar,
and are special functions of 86Duino!
If you want to directly control the hardware IO, you need to switch the pins,
so first you need to understand the IO port of 86Duino.
If you look for the 86Duino CPU Datasheet on the official website,
you can see the coding of each function in the CrossBar Config Registers in the text,
so we need to make the TX and RX of COM1 that we need into the CS and DI of SP,
and don't forget to turn on and off the TX and RX functions.
|
1 2 3 4 |
|
Identify the TX and RX addresses of COM1 and the CS and DI addresses of SPI:
|
1 2 3 4 |
|
Next, enter the test programming:
|
1 2 3 4 5 6 7 8 9 10 11 12 13 14 15 16 17 18 |
|
Once you understand test programming, it's time to incorporate programming functions.
|
1 2 3 4 5 6 7 8 9 10 11 12 13 14 15 16 |
|
Achievements display
Related links
[1] This project Github
[2] Skarner hexapod robot Github
[3] 86Hexapod Github
Homemade Amusement Park Home Page
The text of the 86Duino reference is licensed under a Creative Commons Attribution-ShareAlike 3.0 License. Code samples in the reference are released into the public domain.